How to export Mac files OUT of QEMU?
|
Alright, so you already know how to IMPORT files INTO QEMU, but you'd like to know how the heck to export files OUT of it? Well, it's true that it's kind of awkward to set up at first, but once you got it working, it's a permanent solution and it's hassle free.
STEP 1: CREATE A 2ND HDD DISK IMAGEWhat you want to do is to first create a second HARD DRIVE disk image (not a CD-ROM or DVD disk image!) If you don't know how to create one using SheepShaver GUI or Basilisk II GUI, then you can just grab one of the size you want here on MR. I suggest the 2GB HFS one, which should fit most needs: https://www.macintoshrepository.org/1922-blank-hard-drive-disk-images-100mb-hfs-up-to-30gb-hfs-#d37620 Note: If you downloaded a .zip file, make sure to unzip it to obtain the inner .dsk disk image. That's what QEMU is working it.
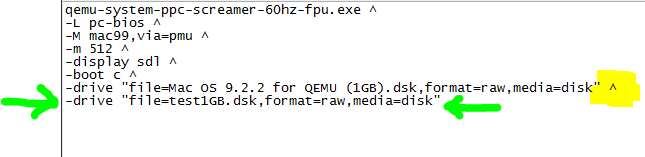
STEP 2: ATTACH THE 2ND HDD DISK IMAGE TO THE QEMU BATCH FILEPut the second HDD disk image in the same folder as QEMU. Now edit the QEMU launch batch file (.bat) and at the end of it, add the hard drive disk image definition. Here's mine below. I added the last line. I also made sure that the lines are ending properly, see the yellow caret [^], this is how QEMU tells that the configuration definition is not finished, so it keeps on reading the file until the end of the line does not end with a caret. All lines should with a caret except for the very last line. Make sure that the "file=test1GB.dsk" actually reflects the file name of your 2nd HDD disk image.
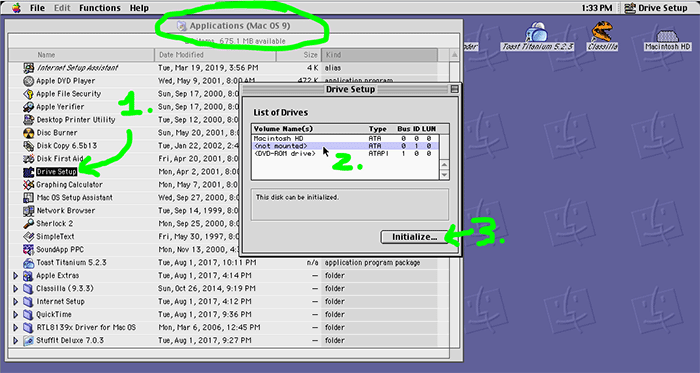
STEP 3: LAUNCH QEMU (AND PERHAPS INITIALIZE THE 2ND HDD)Launch QEMU and wait until the whole desktop loads. You should see the new hard drive icon in second place on the top/right corner. IF YOU DO NOT, THEN DON'T PANIC. This only means that the disk image is not properly formated for the OS that you're emulating inside of QEMU. We'll just initialize it and then it will work. So launch the DRIVE SETUP app that should sit in your Mac OS hard drive, then in the Applications folder. If you deleted it after installing Mac OS, then attach a Mac OS install CD image and you'll find DRIVE SETUP on it. I suggest that you copy this app in your Applications folder and leave it there as it's useful and doesn't take that much space. Anyway, under DRIVE SETUP, click the new hard drive (marked "not mounted"), then hit INITIALIZE. Don't bother changing any setting and just proceed with the initialization. Wait 5 seconds and the new hard drive will show on the desktop :)
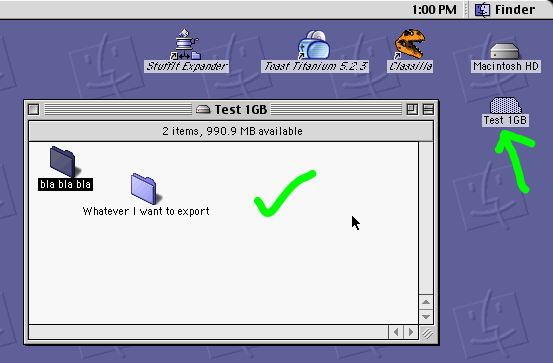
STEP 4: TEST EXPORTING FILESNow that your 2nd HDD is mounted on the desktop, all you have to do when you want to export files is to toss them on that 2nd HDD and shut down QEMU (properly please, not to cause disk image corruption).
And so, now if you open the 2nd HDD image using any disk image manipulating software (such as other Mac emulators, PowerISO, floppyEMU, etc...) you will see your files and you can extract them. Obviously, under anything else than a Macintosh environment, you can't extract an old Mac application or any document that contain a resource fork, otherwise they will be corrupted (lacking the resource fork). If you'd like to copy those under Windows, make sure to compress them using Stuffit (will produce a .sit archive) inside QEMU before you copy them on the 2nd HDD and extract them under Windows.
It works! :)
|
|