How to "burn" (or write or clone) a bootable PowerPC disk image onto an USB stick in Mac OS X using "dd" in Terminal
|
This article lays out the steps in order to "burn" (or clone, or copy) a disk image (such as an ISO boot/install CD) onto an USB stick using only a vanilla Mac OS X environment that any Mac user already has available. You do not need any additional or third party software since Mac OS X is UNIX based and comes with "dd" which is all it takes to accomplish this. Read that other article if you're looking for doing this under Windows using HDD Raw Copy Tool.
COMPRESSED FORMATS AND DMG FILES...Before you begin, if your disk image is zipped or compressed, make sure to expand/uncompress it first. This process does not take ZIP files, it only takes the uncompressed disk image (.iso, .dsk, .toast, .cdr, etc... not .zip, .sit, .7z, etc...). Also, you CANNOT directly write DMG images, because they are compressed. So, if you want to write a DMG image, you have to first convert your DMG to ISO using Disk Utility or use the n00b disk image restore to USB method involving Disk Utility, which all things considered, is much easier than the following method involving the Terminal.
WARNING: Make sure that you understand that what we'll be doing will erase the target volume, replacing whatever data is on the destination drive (an USB stick) with the ISO contents (the disk image file). There is no confirmation, therefore it is critical that you use the proper drive identifier and proper syntax to avoid erasing the wrong disk. So if you've never used "dd" or never have formated a disk under Terminal before, you might want a Terminal savvy friend to assist you the first time for this task. Proceed at your own risk!
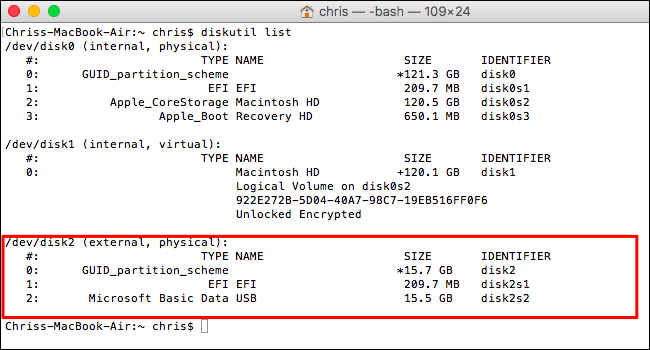
STEP 1) Launch the diskutil with the following command:
This may look something like the following, but note that it will be different on every Mac, since each might have different disk drives:
(diskutil screenshot)
STEP 2) Now, in the disk list you just obtained, find your destination USB stick disk and let's unmount it using the following command (edit the command by replacing ...using the above example (which is not universally applicable) it would give something like this:
* Under some Mac OS X versions or if you get "Resource busy" in the next step, then you might want to run the following command instead:
Very important: When making bootable disks, you need to replace the partition scheme that's located on the ROOT partition (#0) so in this case, the disk identifier for the root partition is
STEP 3) OK, now that the USB stick volume is unmounted, we can begin copying the disk image onto it. Here is the "dd" command to "burn" (or clone, or copy) the disk image. Again, first edit this command by replacing
For example, with a Mac OS 9.2.2 CD ISO file named "Mac-OS-922.iso" on the desktop, the syntax would be:
Note that an "
When you're absolutely sure that the "of=" consists of the DESTINATION drive (AND NOT your internal hard drive!) then press ENTER and the copy will begin. There is no progress bar so just wait it out, how long the ISO copy process takes depends on a variety of things, including the speed of the Mac, the speed of the target volume, and the size of the ISO file being copied or burned to the destination.
STEP 4) When finished, you can eject the volume, it’s ready to go. Obviously, again, replace
|
|